When it comes to protecting sensitive files and data on your server, restricting access to certain directories is a crucial step. While there are several methods for securing a directory, using password authentication is a reliable and straightforward approach. In this article, we'll explore HTTP Basic authentication and how to restrict access to a directory using it.

HTTP Basic Authentication and Its Pros and Cons
HTTP Basic authentication is a simple, standardized method of authentication that allows web servers to restrict access to folders and all underlying files and folders by requiring a username and password. These credentials are managed by a visitor's web browser.
The pros of Basic authentication:
- Easy to implement. Since it is a built-in feature of most web servers, no additional software or plugins are required.
- Compatible with all browsers.
- No need for cookies or sessions.
The cons of Basic authentication:
- Insecure without HTTPS. The authentication credentials are sent in plaintext (Base64-encoded), which makes it vulnerable to interception and eavesdropping. The password is sent repeatedly for each request. The interception can be prevented by using HTTPS (with some caveats).
- No way to log out. Once a user has entered their credentials, they remain authenticated until the browser is closed. This can be a problem for users who are accessing the web page or directory from a public computer or a shared device.
- No customization options. It is not possible to customize the login prompt displayed to users.
Next, we will look at how to implement HTTP Basic authentication for the Apache web server. This method will also work for the LiteSpeed web server. For other web servers, consult their documentation, for example, for Nginx: Restricting Access with HTTP Basic Authentication.
Step 1: Generate a password file
First, you need to create a password file that will store the usernames and passwords of the users you want to grant access to. This file is usually called .htpasswd and can be placed anywhere on your server, but it's recommended to store it outside of the web directory to prevent unauthorized access.
You can create the .htpasswd by one of two methods:
- Using our online .htpasswd generator tool (the easier way).
- Using the htpasswd utility, which is included with Apache (the standard way).
Using our online .htpasswd generator
Generating .htpasswd files with our password tool is easy, you just need to enter the desired username and password and get the resulting file.
Using the htpasswd utility
htpasswd utility is bundled with Apache and allows to create and update the flat files used to store usernames and passwords for basic authentication of HTTP users.
It encrypts passwords using either a version of MD5 modified for Apache or the system's crypt() routine. Files managed by this utility may contain both types of passwords; some user records may have MD5-encrypted passwords while others in the same file may have passwords encrypted with crypt().
Basically, to create a password file you need to execute htpasswd with several arguments:
htpasswd -cb /path/to/.htpasswd username passwordwhere -c switch means "create the password file" and -b means "get the password from the command line rather than prompting for it" (if omitted, you will be prompted for the password).
For a list of all htpasswd switches consult the documentation or execute htpasswd -h.
Step 2: Upload your .htpasswd file
If the password file was generated outside your web server, you need to upload it. For security reasons, you should not upload the .htpasswd file to a directory that is web accessible. Place it above your wwwroot/htdocs directory instead. After uploading complete, you need to find out the full path to this file. Please note that this is not an URL but a full file path that will look something like /home/user/path/.htpasswd on the Unix systems.
Step 3: Create the .htaccess directives
The next step is to create a .htaccess file (if you don't have one yet) in the directory you wish to password protect. If you place this file in your web root directory, it will password protect your entire website.
The authorization directives may look like this:
AuthType Basic
AuthName "Restricted area"
AuthUserFile /path/to/.htpasswd
Require valid-user
- The AuthType directive specifies the authentication type, which is Basic in this case.
- The AuthName directive is used to specify the name of the realm, which can be displayed to users when they are prompted to enter their username and password (that depends on browser implementation).
- The AuthUserFile directive specifies the path to the .htpasswd file that you created in Step 1.
- Finally, the Require directive specifies that only valid users should be allowed access to the directory.
Optional Step 4: add additional users
To add additional users to the .htpasswd file, you can use the htpasswd utility again. However, this time you should not use the -c flag. Instead, the syntax is as follows:
htpasswd /path/to/.htpasswd username
After running this command, you'll be prompted to enter a password for the user. Once you've entered the password, the user's information will be added to the .htpasswd file.
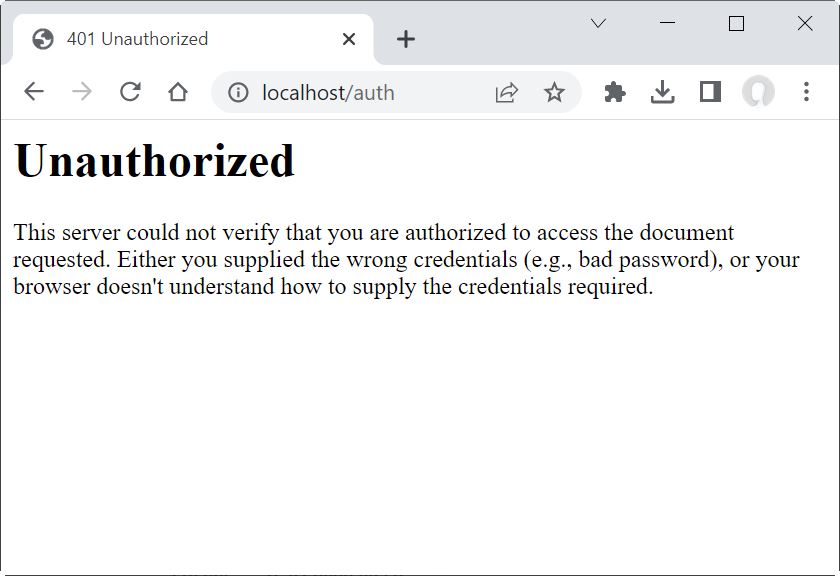
Testing
After creating the .htaccess file, you should test whether access to the directory is restricted. To do this, try accessing the directory using a web browser. You should be prompted to enter a username and password:

If you enter the correct credentials, you'll be granted access to the directory. If you enter the wrong credentials, you'll be denied access:
Conclusion
Using HTTP Basic authentication to restrict access to a directory is a simple and effective way to protect sensitive files and data on your server. By following the steps outlined in this article, you can easily create a password and .htaccess files, and grant access to authorized users. It's important to keep in mind that the password file should be stored in a secure location and that passwords should be strong and unique.